Pre-log and Web Portal Guide
Table of Contents
- Introduction
- Gaining Agency Access
- How to Log-in
- How to Pre-log a Case
- How to Submit a Case after Pre-log
- How to Check Status of a Case
- How to Download Packets
1. Introduction to LIMS Portal
Purpose
- The purpose and benefit of using an electronic pre-logging and case status notification system is to streamline the process from submitting evidence to the RFSC and to have case reports and other case information (case packet) provided to the investigating agency in real time.
- Pre-logging case information and evidence into the LIMS will expedites submission time by replacing hardcopies of the Laboratory Examination Request form and chain of custody.
- Officers assigned as Investigators can check the status of their case(s). Statuses include evidence submission, case progression, and case completion.
- Additionally, the Officers assigned as Investigators, as well as those assigned to Carbon Copy, will receive electronic notification once a case has been completed and that the case packet is available for download.
Who Can Have Access
- Only authenticated Officers from approved contributing agencies will be granted access to the portal. To be authenticated, the Officers must have a KCJIS token and be verified by the RFSC.
Can I Submit Without Pre-logging
- Yes, agencies may still submit evidence without pre-logging. If necessary, a computer kiosk located in Evidence Receiving will be available for the submitter to access the portal.
Who Receives the Notifications
- Any person assigned an Investigating or Carbon Copy role during case submission with a valid email address in LIMS receives notifications. These roles can be amended at any time including after a case is submitted.
Who Can Download a Packet
- Any person assigned an Investigating or Carbon Copy role during case submission with a valid email address in LIMS, and a KCJIS token can download a packet. These roles can be amended at any time including after a case is submitted.
What if I have any Questions
- If you have any issues or questions, you may contact the LIMS Administrator via email at lims@sedgwick.gov.
2. Gaining Agency Access
Request for Approval Through KACIS
- The agency Technical Assistance Center (TAC) will first need to request for your agency’s approval to the SEDGWICK CO RFSC LIMS APPLICATION by the RFSC LIMS Administrator. To do this the TAC will need to log into KACIS and submit approval by using the Agency Access Management tab.
- The steps to follow are:
- Log-in to KACIS then Select Agency Access Management then Select Request Application for Agency then Select SEDGWICK CO RFSC LIMS APPLICATION then Read the agreement and select OK à Select Request
- The RFSC LIMS Administrator will be notified of your agency’s request for review. Once approved, the TAC will be notified.
Request of a KCJIS Token
The request for a KCJIS token will be handled by your agency’s TAC.
3. How to Log-in
Logging into LIMS Portal
The following steps describe how to log-in to the portal:
- Go to “rfsc.sedgwickcounty.org/fawebportalprod".
- There you will see a green button labeled “RFSC CASE Login.
- Select the green button and log-in to the portal the same way you log-in to KCJIS.
- Once logged-in, you will come to the landing page with “Case Status” and “Prelog” in the upper left corner.
4. How to Pre-log a Case
Using the Prelog Link
Selecting the Prelog link will open the Request For Laboratory Examination (RFLE) form. Once the form is complete and submitted, the RFSC will be notified of the pre-logged case.
What Information is Required to Pre-log a Case
The following table outlines what information is required and what is optional. Entering information into optional fields can be helpful to fulfill the examination request (i.e., adding a request for generation of case fires for NIBIN in the Submission Comments section).
|
Section |
Entry |
System Required |
RFSC Required |
Optional |
|---|---|---|---|---|
|
Agency Information |
Agency Name |
Yes (Pre-populated) |
|
|
|
|
Jurisdiction |
|
Yes (Pre-populated) |
|
|
|
Officers (Name and Role) |
|
Yes |
|
|
Case Information |
Agency Case # |
Yes |
|
|
|
|
Offense Date |
Yes |
|
|
|
|
Offense |
Yes |
|
|
|
|
Court |
|
Yes (If known) |
Yes |
|
|
Jury Trial Date |
|
Yes (If known) |
Yes |
|
|
Return Method |
|
|
Yes |
|
|
Parties of Interest |
|
Yes |
|
|
|
Business |
|
|
Yes |
|
Evidence |
Agency Item # |
Yes |
|
|
|
|
Description |
Yes |
|
|
|
|
Exams (Lab Assignment) |
Yes |
|
|
|
|
Attachments |
|
|
Yes |
|
Statement of Facts |
|
Yes |
|
|
|
Submission Comments |
|
|
|
Yes |
Filling out the Request for Laboratory Examination Form (RFLE)
The form has six sections (Agency Information, Case Information, Evidence, Attachments, Statement of Facts, and Submission Comments) to which information can be added. Refer to Table 1 (above) to see what information is required to pre-log a case.
A. Agency Information
- In this section, the Agency Name and Jurisdiction will be pre-populated; please verify the information is correct. You will enter the Officer name(s) and associated role(s) (Investigating, Submitting, or Carbon Copy).
- Click “Add” to assign each Officer and their respective role: Investigating (individual assigned to the case), Submitting (individual submitting the evidence), or Carbon Copy (individual who is given access to the case information). You can add multiple individuals and assign them multiple roles. At a minimum, you need to add one Investigating and one Submitting person.
B. Case Information
- In this section, enter the Agency Case Number, Offense Date, Offense (Violation), Court, Jury Trial Date, Return Method (Hand to Hand Transfer), Parties of Interest, and Business Information.
- Enter all available information to streamline the submission process at the RFSC. Note: If completing the Return Method section, you will almost always want to select Hand to Hand Transfer.
- To add parties of interest, select the “Add” button under that heading. The parties of Interest Form pop-up will appear. Enter at least the Type (Suspect, Victim, Party of Interest, or Decedent) and the person’s last name. If unknown, type “Unknown” in the Last Name field.
- Similarly, complete the Business section if a business is the Victim or Party of Interest.
C. Evidence
- In this section, enter each item of evidence for the case by selecting “Add.” The Agency Item #, Description, and Exam(s) are required fields.
- Agency Item #: Enter the item number designated by your agency to identify the evidence, which is usually located on your agency barcode.
- Description: Enter the description of the evidence, which can be similar to the description on the package and/or label. Note: The Description * button can be used for shorthand codes.
- Exam(s): An Exam Types window will appear after clicking in the Exam(s) field. Select the appropriate laboratory examination type for the evidence (Biology Screening, Drug ID, Fire Debris, Firearms, and/or Toxicology). Multiple exam types can be selected for one piece of evidence (i.e., Biology Screening and Firearms).
- Comments: this field is optional but can be used for additional information.
D. Attachments
- In this section, you are able to upload pertinent documents and/or photographs related to your case or evidence.
E. Statement of Facts
- In this section, enter the case synopsis and/or request details. Provide enough information in order for the laboratory to understand the request, type of testing needed, and the forensic question(s).
F. Submission Comments
- This section can be used to provide the laboratory with additional information or make a specific request (i.e., retain three test fires for NIBIN).
G. Submit the Case Pre-log
- Once the form is completed, select the submit button on the bottom. A Success pop-up window will appear with the Request ID. Click OK to return to the RFLE form. At this time, you can print the form for your records.
What if I have Multiple Cases to Pre-log
- After submitting the RFLE form, it is recommended to scroll to the top of the page, select the “Prelog” link, and click “Leave.” This will maintain the agency name and jurisdiction. Alternatively, select the “Clear Form” button at the bottom to clear all fields.
What if I Need to Pre-log a Subsequent Submission
- Subsequent submissions of the same case will go through the same pre-logging process. However, if the case has previously been pre-logged you can use the “Existing Lab Case #” search feature located at the top of the RFLE by entering the RFSC Lab Case # in the field. For convenience, this will populate the new pre-log form with previous information. All additional or new information should be added prior to submission.
5. How to Submit a Case After Pre-log
Process of Submitting Cases After Pre-log
- Once the RFLE form has been submitted, it can be printed for your records. Next, evidence will need to be submitted to the RFSC.
Do I have to Bring the RFLE Report when Submitting
- No, the RFSC does not require the form. However, it can be brought for your convenience.
Where does the Information go after I Submit a Pre-log Request
- The case information goes into a Pre-log Requests folder in the RFSC LIMS. This information will remain there until the evidence is submitted or deleted by the RFSC.
6. How to Check Status of a Case
Where do I go to Check Status after Log-in
- Log-in to the FA Web Portal and click on the “Case Status” link in the upper left corner. This page will display completed cases.
Locating a Completed Case
- Completed cases are located in the “Case Status” link.
- The “column” link in the upper right corner can be used to rearrange, add, or remove available columns.
Locating a Non-completed Case
- If the desired case is not displayed on the Case Status page, click on the “Search” link, enter the case information in any field(s), and select “Search.
- Common fields include:
- Agency Case #: this is your agency case number
- Suspect Name
- Victim Name
- Case #: this is the RFSC case number
- Common fields include:
7. How to Download Packets
What is Included in the Packets
- A packet will include different documents depending on the case type. See below.
| Exam Type | Included Documents (if applicable) |
|---|---|
| Biology / DNA | Lab Report, Chain-of-Custody, and Restitution Order |
| Drug ID | Lab Report, Chain-of-Custody, and Restitution Order |
| Firearms | Lab Report, Chain-of-Custody, Restitution Order, and GRC Reports |
| Fire Debris | Lab Report, Chain-of-Custody, and Restitution Order |
| Toxicolgoy | Lab Report, Chain-of-Custody, Restitution Order, and Reference Lab Reports |
What to do after Notification
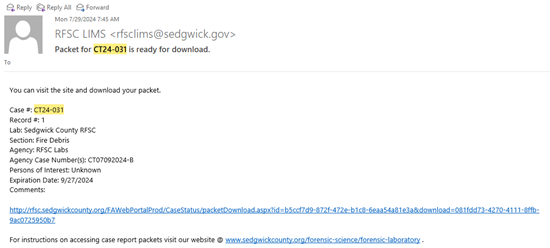
- The following steps describe how to download the case packet:
- Log-in to FA Web Portal by going to the website and using your KCJIS token.
- Select the link in the email(s) to download the packet. Alternatively, you can select the “Case Status” link described above and select the specific case from the list.
- If you open the case through “Case Status”, scroll to the bottom of the window to the “Records” section, and select the “View Packets” link. Select “Download".
- A folder is created on your computer after the packet is downloaded.
- The folder contains the appropriate documents within the “Files” folder. The PDF containing the laboratory case number is the default coversheet.
- These documents are for your record.
How Long are Packets Available for Download
- The packets will be available for download for 60 days after the email notifications are sent.
- If a packet is needed beyond this timeframe, please contact the RFSC at lims@sedgwick.gov.